How to Paint a Realistic Miniature Thanksgiving Turkey
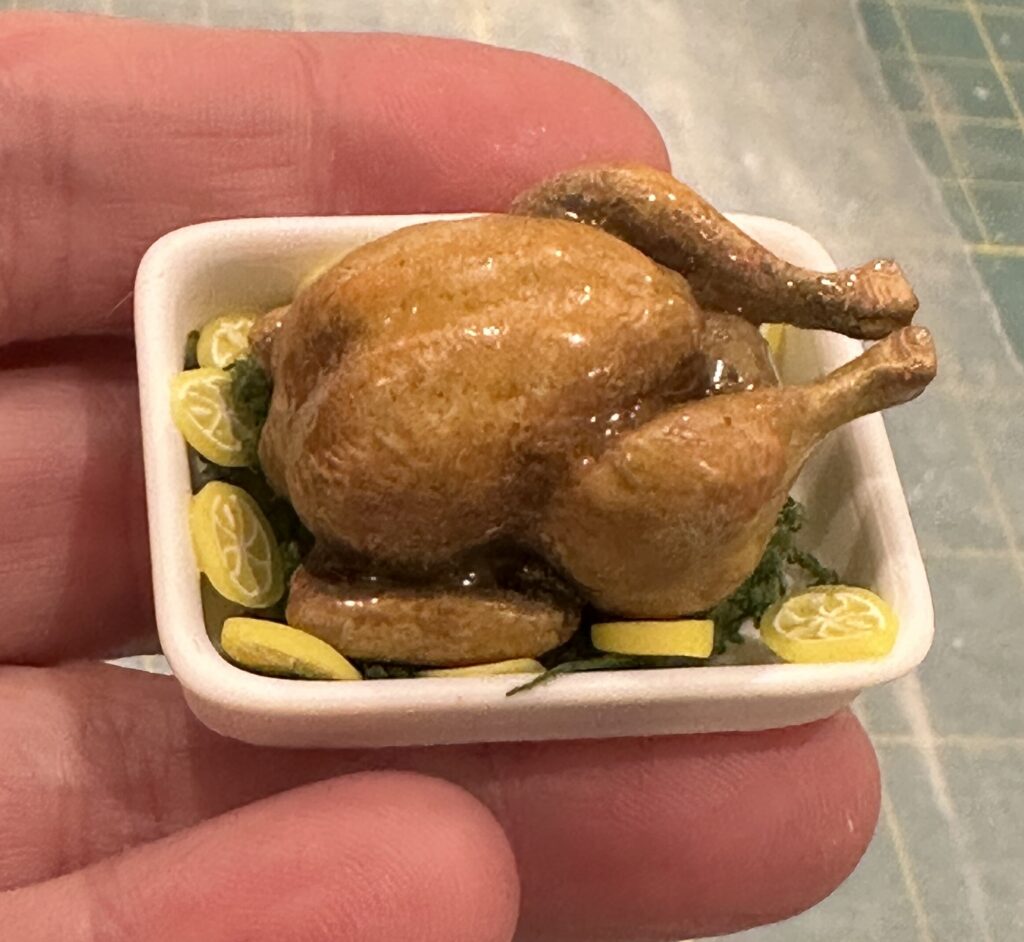
There is something especially fun about creating miniature versions of everyday things, and food is one of my favorites! For this project, I decided to make a realistic miniature Thanksgiving turkey as the centerpiece of a complete dollhouse holiday dinner.
Rather than sculpting the entire bird from polymer clay, I started with a 3D-printed model and used layers of acrylic paint to transform it into a realistic miniature roast turkey.
The trick was capturing that delicious golden-brown appearance of a turkey fresh from the oven. With several layers of paint and some inspiration from photographs of real Thanksgiving turkeys, I was able to create just the look I wanted.
Materials and Supplies
- 3D-printed miniature turkey model (STL file purchased from MiniJackWitcher on Etsy)
- Filament 3D printer, or access to a suitable 3D-printed model
- Light-colored acrylic craft paint for the base coat
- Acrylic craft paints in shades of golden yellow, tan, amber, and brown
- Small paintbrushes for layering and detailing
- Fine textured sponge (I used a thin pottery sponge)
- Toothbrush
- Photographs of real oven-roasted turkeys for color inspiration
- Clear craft spray varnish
- Protective covering for your work surface (If needed)
About the 3D Model
I purchased the digital STL file for my miniature turkey from MiniJackWitcher on Etsy. The design is called Roast Turkey with Baking Tray — Thanksgiving & Autumn Diorama.
I printed the turkey on my Bambu Lab P1S filament printer. While the original 3D model was created by MiniJackWitcher, the painting and finishing techniques I’m sharing in this tutorial are my own.
Original 3D Model: Roast Turkey with Baking Tray by MiniJackWitcher on Etsy
Step 1: Printing the Miniature Turkey
I printed my miniature turkey using my Bambu Lab P1S filament 3D printer. I always check my settings and the object size before I print. For my 1:12 scale dollhouse, I wanted a generously sized Thanksgiving turkey, so I based the proportions on an approximately 18-inch turkey in a 24-inch roasting pan.
💡 GoAlongs Tip — Getting the Scale Right
At 1:12 scale, an 18-inch turkey measures 1½ inches (38 mm), while a 24-inch roasting pan measures 2 inches (51 mm).
When resizing your STL file in Bambu Studio, remember to keep the proportions locked so the turkey and roasting pan scale correctly.
One of the things I liked about this particular model was the amount of detail already incorporated into the design. The breast, wings, and legs were nicely defined, giving me an excellent starting point for the painting process.
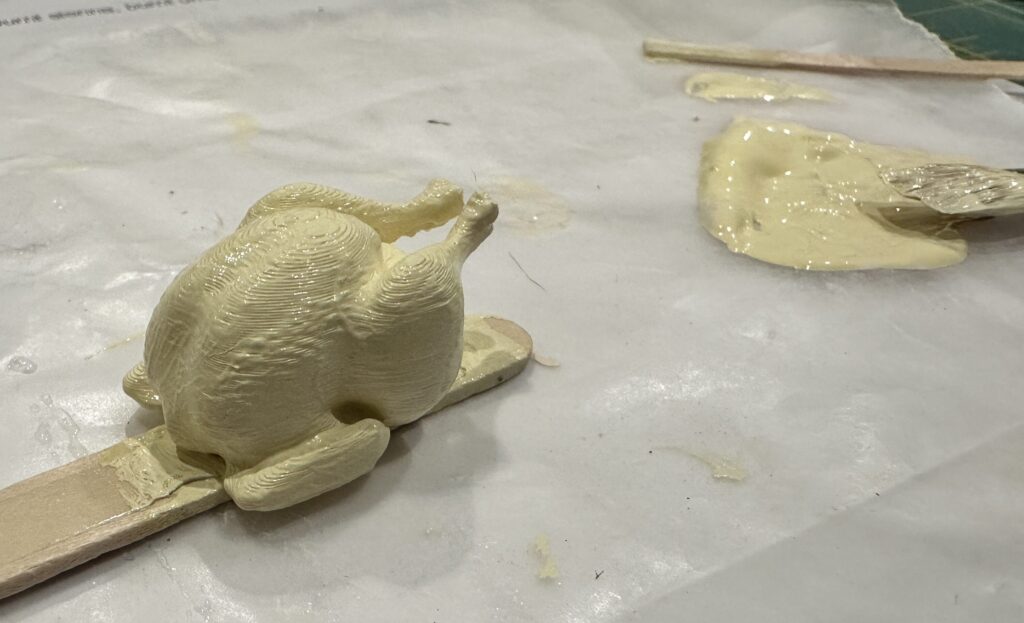
The turkey began as a plain, light-colored print. At this stage, it certainly didn’t look ready for Thanksgiving dinner, but all those little details would help bring it to life once the paint was added!
Step 2: Applying the Base Coat
Once my turkey was printed, I applied a light-colored base coat of acrylic craft paint.
This gave me a good starting point for building up the golden and brown colors of a roasted turkey. In addition to providing a good foundation for the layers of color, the paint helps fill in and soften some of the visible 3D printer layer lines, giving the miniature a smoother, more realistic appearance.
Depending on the print quality, you may need more than one thin coat to achieve the finish you want. Allow each coat to dry before adding another so you don’t obscure the finer details of the model.
One thing I’ve learned is that coloring a filament print is a little different from working with raw polymer clay. Chalk pastels don’t adhere particularly well to the printed surface unless you use some type of binder. For this project, I chose to build up the color with acrylic paints instead.
💡 GoAlongs Tip — Make Painting Tiny Objects Easier!
Painting tiny miniatures can be tricky when you’re constantly trying to hold them without touching the wet paint!
One of my favorite tricks is to attach the miniature to a wooden craft stick using a small piece of double-sided tape. This gives me a convenient handle so I can rotate the piece and paint it from different angles without getting paint all over my fingers.
If the tape is too sticky, I simply touch the adhesive lightly with my fingertip a few times. The natural oils from my skin reduce the tackiness just enough to make removing the finished miniature easier.
It’s a simple trick, but it makes painting tiny objects so much easier!
Step 3: Building Realistic Roasted Colors
This is where the turkey really begins to come to life!
Before I started painting, I gathered several photographs of real, oven-roasted Thanksgiving turkeys to use as color references. One thing you’ll notice when looking closely at a roasted turkey is that the skin isn’t just one shade of brown. There are beautiful variations of golden yellow, warm amber, toasted brown, and deeper roasted colors.
I began building up these colors gradually, using thin layers of acrylic craft paint. Rather than covering the entire turkey with one uniform shade, I worked with the natural contours of the model, allowing some areas to remain lighter while adding deeper colors to others.
To create subtle variations in the surface color, I used a combination of small paintbrushes, a fine-textured pottery sponge, and an old toothbrush. By lightly dabbing paint onto the surface, I could add irregular patches of color without creating obvious brushstrokes.
To give the turkey more depth, I also used darker shades of paint in the creases and recessed areas around the wings, legs, and other details. This helped emphasize the natural contours of the bird and created the shadows you would see on a real roasted turkey. The contrast between the darker creases and the lighter golden areas made a big difference in the finished appearance.
The amount of color variation is really a matter of personal preference. I wanted my turkey to have a naturally roasted appearance, so I kept the effect fairly subtle and continued layering until I was happy with the result.
💡 GoAlongs Tip — A Little Paint Goes a Long Way!
When using a sponge or toothbrush to add color, start with very little paint. You can always add more! Lightly dab the tool on scrap paper first to remove excess paint, then gradually build up the color on your miniature.
Don’t be afraid to refer back to your inspiration photographs throughout the process. Those little variations in color are what help bring your miniature food to life!
Step 4 — Styling the Miniature Turkey
Once the painting was finished, it was time to make my turkey look ready for Thanksgiving dinner!
I placed the turkey in a miniature serving pan and added some greenery and tiny lemon slices to create a more realistic presentation.
The greenery is actually an inexpensive landscaping material used for miniature models and dioramas. You can find similar materials online at places like Temu and other miniature supply retailers. It’s easy to pull apart into little pieces, making it perfect for adding greenery around miniature food.
I used museum wax to hold the individual pieces in place. Museum wax is one of my favorite little tricks for miniature displays because it helps keep tiny accessories from sliding around or falling over.
I arranged the greenery and lemons around the turkey until I was happy with the presentation.
💡 GoAlongs Tip — Keeping Everything in Place!
A tiny amount of museum wax can make arranging miniature scenes much easier. Use just enough to secure each piece, especially when working with accessories that you may want to reposition later.
Step 5: What I’d Do Differently Today
One of the fun things about revisiting an older project is seeing how much you’ve learned!
I created this turkey for Thanksgiving last year. Since then, I’ve taken several classes in miniature making and learned new techniques that I would love to incorporate if I made it again.
I’m still pleased with how my turkey turned out, but there are a few things I’d improve today.
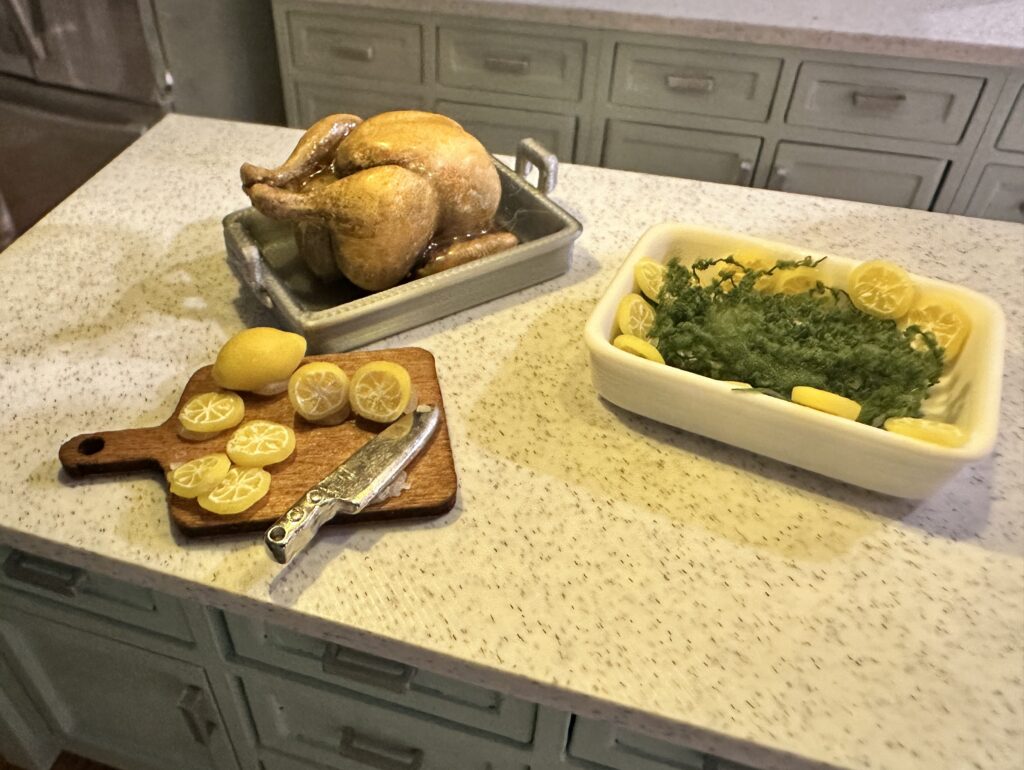
Add roasting juices and fat. Looking back, the roasting pan is a little too clean! A real roasted turkey would have delicious juices and rendered fat collecting around the bottom of the pan. Adding those details would help make the scene even more convincing.
Give the lemons more texture and shading. The miniature lemon slices add a nice pop of color, but I would now add more surface texture and subtle chalk pastel shading. Small variations in color would make them look more natural.
Hide the museum wax more carefully. If you look closely at some of my photographs, you can spot a little of the museum wax I used to hold the pieces in place. Next time, I’d use smaller amounts and take more care to conceal it beneath the decorations. For arrangements I don’t plan to change, like the lemons on the cutting board, I’d consider using a small amount of glue instead. That would create a permanent arrangement without any visible wax.
The wonderful thing about miniatures is that there is always something new to learn. Every project gives us an opportunity to experiment, improve our techniques, and try something different.
And sometimes, looking back at an earlier project is the best way to see how much we’ve grown as makers!
💡 GoAlongs Tip — Keep Your Early Project Photos!
Don’t delete your older project photographs just because you’ve learned a better technique. They’re a wonderful record of your creative journey and can help you see how your skills develop over time.
Coming Next: Miniature Turkey Slices with Polymer Clay
In Part 2 of my Miniature Thanksgiving Feast series, I’ll show you how I made realistic slices of turkey using polymer clay, chalk pastels, real dried herbs, and a few simple texturing tools.
It’s a fun technique that gives each tiny slice the appearance of freshly carved turkey!
Creative Ideas and Inspiration that Go Along with YOUR Life!